
Cherry Coconut Almond Granola

Mornings always seem to be rushed. No matter what time I get up, there is just never enough time to get ready, let alone eat something healthy on the go. So, on the weekends I tend to make granola. I love granola, plain Greek yogurt and fresh berries! This is satisfying and fulfills my sweet tooth. Also, the best part is, I can throw this all in a container and eat at work if there is not enough time! Talk about a win win! In addition, this is a great recipe to switch up! Depending on the season, what’s in your kitchen, and what you are enjoying that week, you can always adjust your granola!!

I absolutely LOVE cherry coconut almond anything! I made an amazing bread earlier that was posted to the blog with this same combo!

I absolutely love this recipe! No sugar, or any junk like that! It’s all healthy things for you!

Cherry Coconut Almond Granola
Serving size: ¼ of a cup makes about 12 servings
3 cups rolled oats
2 teaspoons of cinnamon
¼ cup of chopped almonds (I like to buy whole almonds then chop when I need them.)
¼ dried cherries and golden raisins
¼ chopped dried coconut (I found it at Trader Joe's)
½ cup of unsweetened applesauce
¼ cup of honey
1 tsp of almond extract
Directions:
Line a baking sheet with parchment paper.
Preheat oven to 325.
In a large bowl mix together, oats, cinnamon, chopped almonds, coconut and cherries.
In a separate bowl mix together unsweetened applesauce, honey, and extract.
Pour liquid over the oat mixture. Make sure to mix everything together. You want all of the oats coated in the liquid.
Gently spread on the baking sheet.
Bake for 50-60 minutes, making sure to check every 20 minutes or so to spread around the granola to make sure nothing burns.
Remove when it is dry and a golden brown color.
Allow granola to cool, if you can, then transfer into an airtight container.
I’ll understand if you can’t wait to eat it. My husband and I never have that much self-control!
Total Time:
Prep: 5 minutes
Bake: 50-60 minutes
Cherry Almond Bread


This bread did not disappoint! The cherries and yogurt kept the bread moist while the slivered almonds gave a great crunch! I ended up making 2 batches; one for our priest, and one for my room mothers! Paul got a few slices when we met the priest to discuss our readings for the big day and he said this bread was delicious! He even dared to say it was his favorite yet and he knows his baked goods!


Cherry Almond Bread
Makes one loaf
2 cups of all-purpose flour
1 tsp of salt
½ cup of truvia
1 ½ tsp of baking powder
2 eggs
1 stick of unsalted butter brought to room temperature
½ cup of greek plain yogurt
2 cups of chopped cherries
2 tbsp of almond extract
1 tbsp of silvered almonds for topping
loaf pan
Directions:
Heat oven to 350 degrees.
Mix together flour, baking soda, cherries, and salt.
Blend butter and sugar together until there are much smaller chunks of butter. Slowly add eggs. Add almond extract. Blend until somewhat smooth. It will still be a little chunky with the butter.
Add the wet ingredients to the dry. Knead together until it is all mixed.
Form into a loaf in the loaf pan. Sprinkle 1 tablespoon of slivered almonds on top of the loaf. Then lightly press the almonds into the dough. You want to make sure it bakes into the bread.
Bake for 1 hour or until golden brown on top. Also make sure when you stick a knife in the center it comes out clean.
Enjoy with smeared marmalade or jam! It is even better lightly toasted in a pan with a little coconut oil, just sayin!

Blackberry Lemon Marmalade

As I sit here eating watermelon, yum, I can’t even believe our wedding is one month away. I have been trying to get things done earlier rather than later so that everything won’t happen all at once. Especially because I have 10 days left of school! Ah! There is so much to do! One of those things on my to do list was to figure out a present for my room mothers. I have two this year in my classroom. It was the first year that we were assigned room parents and it really has been a treat! I have been dying to try canning! I was afraid especially for the sterilization process but I have to say it was so easy! I think I’m addicted now! Just this weekend alone I’ve made 5 cans of jam/marmalade. I’m going to make another batch tonight for my mamma, whom I’ll see next weekend! I’m thinking tonight I’ll try blueberry lemon marmalade! I’ll let you know how that comes out.

Let’s talk about this blackberry lemon marmalade and exactly what is going on. The true definition of marmalade is “Marmalade is a fruit preserve made from the juice and peel of citrus fruits boiled with sugar and water. It can be produced from kumquats, lemons, limes, grapefruits, mandarins, sweet oranges, bergamots and other citrus fruits, or any combination thereof.” Thanks wikipedia. I was very nervous about keeping the skins on the lemons in the marmalade but boy am I glad I did! They almost candied when it was all said and done! They are a little bitter when you get a bite but mixed with the blackberry it levels out the bitterness. As long as you cut them into bite size pieces they will be amazing. I am so in love with the sweet yet sour taste of this marmalade. I actually spooned it right from the jar to eat it! Not really part of the wedding diet, I’m sure, but I just couldn’t resist!
I also am a strong believer on NOT using any artificial sweeteners EVER. I used to be addicted to Splenda. I hate even admitting I would put 3 in my coffee DAILY. Then I started reading about the stuff and realized how bad it was for me. When I stopped my chronic headaches did as well and I dropped 3-5 pounds too! Incredible. I also realized how I didn’t even need anything to sweeten up my coffee! I just drink it black now or, if anything, maybe some almond milk. Of course, I occasionally will have a skim latte, my absolute favorite, but only once in awhile! Back on track, I did use Truvia in this marmalade. It was all they had at the grocery store I went to. I would have gotten stevia but I think Truvia is okay. I wouldn’t use it all the time but for this it was all right! I did like how I didn’t have to use much!
I hope you enjoy and make sure to smear this on your favorite bread! I’ve been eating it on some delicious Ezekiel Cinnamon Raisin English Muffins. My absolute favorite! I’ve even put a dollop in my plain Greek yogurt and it tastes like a treat!
Blackberry Lemon Marmalade
Made 2 - 8 oz glass jars
3 small cartons of Blackberry Containers (it came to a little less than a pound, it was about 12 ounces.)
4 medium lemons
Juice from one lemon
Juice from one lemon
½ cup of truvia (or 1 cup of sugar)
2-3 sterilized jars (just in case you have extra)
Directions:
Sterilize the jars. I place the glass jars (without the lids) in a large boiling pot of water for the entire time the rest of the ingredients are cooking.

While jars are sterilizing you can begin the cooking. Place a small dish in the freezer which you will use at the end for testing the marmalade.
Wash the blackberries really well as well as the lemons. Give the lemons a good scrub because you will be eating the skins in the marmalade. Cut the lemons into bite size pieces. I would even go on the smaller end. Taking out the seeds as well as the white membrane (what encases the fruit). Place seeds and membrane into a cheese cloth and set aside.

Place blackberries, juice from one lemon, and sugar in a large pot. I used my fancy new Le Creuset (thanks mamma J)

Cook down until the liquid is just about covering the blackberries (took around 5-8 minutes)

Then drain the blackberries in a colander with a bowl underneath. I like to stir the blackberries here to get all the juices out.

Set the blackberry fruit aside. Take the blackberry juice and return back into your original pot (my Le Creuset)
Then add the lemons (skin on) to the liquid. Then add the cheesecloth with the membrane and seeds. This has natural pectin in it, which thickens the marmalade.

Bring this liquid to a boil for around 5-8 minutes until it becomes thick, almost syrupy. (I never used a thermometer even though a lot of things I read about canning says you should however you do not need to. You want it to get about 220 degrees here for about five minutes. I however, just waited for most of the liquid to evaporate and it became thick like jelly.)
Then add back the blackberries and cook for another 5-8 minutes or until the marmalade is thick. I also used a chilled plate to help. Once I thought the mixture was ready I put a dollop on the chilled plate and if it didn’t run off the plate I knew I was good to go! A good test is if you drag your finger through the marmalade and it is wiped clean. Then you know it’s set.) Then remove cheesecloth and discard.
Once the marmalade has thickened. Take it off the heat. Let it sit for about 5 minutes.
While your marmalade sets, place your jar lids in a glass bowl.
Carefully take out the jars from the boiling water. I used tongs.
Then carefully spoon the boiling water into the glass bowl with the lids just until the lids are submerged.
Carefully scoop your marmalade into each jar. Leaving about ¼ of the top empty.
Tighten the lids onto your jars. Not too tight.
Place the jars back into your canning pot. Make sure they’re submerged in the water about an inch of water should be covering them.
Once the water starts boiling set the timer for about 10 minutes. Lift carefully here and let cool. I used tongs however I would like to get a canning tool for this. The marmalade will keep for about a year! Good luck!

I love this smeared on some Ezekiel bread!


Greek Lettuce Wraps

Life has been pretty hectic lately! We are trying get a lot of last minute wedding things done like favors, papery, practicing our dance moves (oo lala) and just all the other day to day things! Did I mention as well we’ve been hitting up the gym like crazy people?! We are down to 38 days! Yikes!
The other night, after an intense gym class, sports conditioning at Gold’s Gym, the last thing I wanted to do was cook. So I looked in the fridge and threw this together. I had read a similar recipe in Giada’s new cookbook, which is fabulous! The end result tasted like a deliciously dressed Greek Salad!
It was a touch light, so Paul says, but it was perfect for me J


Serves 4-5
Adapted from Giada’s Feel Good Cookbook
For the Dressing:
Juice from half a lemon
¼ cup of extra virgin olive oil
2 tablespoons of apple cider vinegar
1 garlic clove chopped
½ teaspoon of salt
1 teaspoon of pepper
For the Wraps:
1 cup grilled chicken
1 cup of arugula
10 green olives chopped
2 tablespoons of sun dried tomatoes in olive oil
¼ cup of feta cheese
Half of a fennel bulb chopped
Half of an avocado chopped
Chopped parsley
Chopped basil
8 butter lettuce leaves
Directions:
1. In a small bowl mix apple cider vinegar, oil, lemon, garlic, salt and pepper together.
2. In a large bowl mix chicken, arugula, sundried tomatoes, feta cheese, green olives, fennel, avocado, parsley, basil, salt and pepper.
3. Slowly pour the dressing over the chicken mixture and mix together.
4. Place about ½ cup of mixture over butter lettuce.
5. Serve and enjoy!

Vegetarian Hummus Wrap

I made this wrap the other weekend as we were running around. I wanted something filling and delicious but that wouldn’t wreck the “wedding diet.” This definitely hit the spot! Even Paul enjoyed this and as we all know he is a MEAT lover! It was creamy with the goat cheese yet crunchy with the raw kale and spinach. It is definitely going to be my go to when I’m feeling a wrap!
Vegetarian Hummus Wrap
Serves 1
2 tsp of olive oil
¼ of a sweet onion
½ cup of spinach
½ cup of kale
2 tbsp of hummus (I used my Guacamole Hummus)
1 oz of crumbled goat cheese
1 tsp sesame oil
1 tbsp balsamic vinegar
2 tsp Tamari
1 Ezekiel Whole Wheat Tortilla (I found at Whole Foods)
Directions:
Heat pan with the olive oil.
Slice the onion in thin strips. Sauté until caramelized (takes about 15 minutes sometimes a little longer)
Heat tortilla in a separate pan so it gets a little toasted. (I dislike chewy wraps!)
Spread hummus on wrap ( I used my Guacamole (without avocado) Hummus)
Mix together sesame oil, balsamic, and Tamari. Pour over the spinach and kale and mix together.
Layer the onions, dressed spinach, dressed kale, and goat cheese on the tortilla.
Roll it up, slice in half and enjoy!

Guacamole Hummus

My students have been off the charts lately with how chatty they are! I think we are all counting down the days until summer! Only 3 Mondays left! We can do it! I am excited to have summer however, A. that means the wedding is literally three weeks away at that point and B. I really really really enjoyed my students this year! I’m going to miss each of them next year! It was probably my best class yet!
But, let’s move on to some food! I know I have already said this but I really love hummus! This weekend I was playing around with what was in the fridge and made this new recipe. It honestly tastes just like guacamole sans avocado! I am not opposed to putting avocado in my hummus I just didn’t have any, which is weird, because we always have those in the fridge but we were all out! I will have to try that next time!

Guacamole (without the avocado) Hummus
Serving size 2 tablespoons
2 cans of garbanzo beans drained
½ cup of chopped cilantro
1 clove of garlic
2 Tbsp of olive oil
½ teaspoon salt
1 teaspoon of pepper
Juice of one Lemon
½ cup of spinach
Serve with:
Directions: In a blender, combine the beans, lemon juice, garlic, salt, pepper spinach and cilantro. Blend until smooth. Gradually add the olive oil and mix until creamy. Yummy!

Simple Lemon Garlic Hummus

I absolutely love hummus! I use it as a snack almost everyday! I love it with veggies or even as the dressing on my salad. It’s creamy and delicious. When we received the Vitamix as a wedding present this was one of the first things I made!


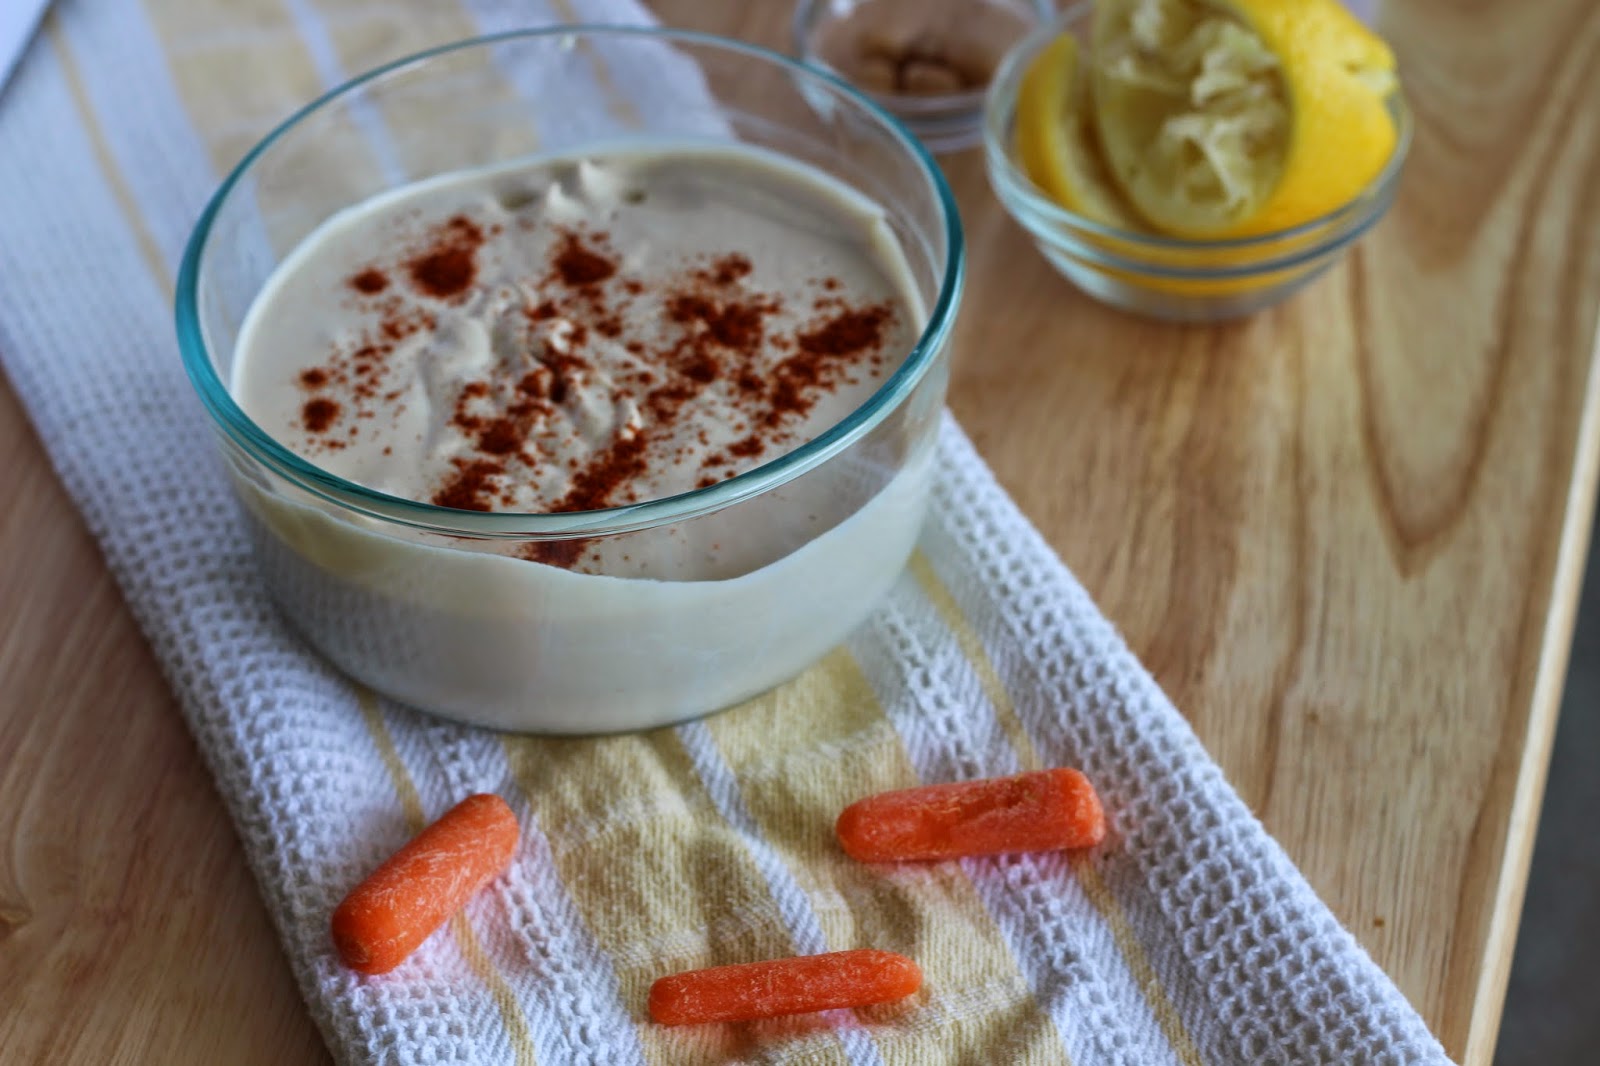
Simple Lemon Garlic Hummus
Serves 4
Serving size 2 tablespoons
1 can organic garbanzo beans
1 clove of garlic
¼ cup of coconut oil
1/8 cup of Tahini
1 tsp of paprika
Juice from one lemon
Salt and Pepper to taste
Directions:
Place all ingredients into the blender and blend until smooth.

Basil Omelet with Berry Toast

This is my favorite go to Saturday or Sunday breakfast! Most mornings are too crazy in our house to whip this together however total I would say it takes about 15 minutes. It is so easy yet so delicious and filling!
Basil Omelet with Berry Toast
Serves 1
1 egg with yolk (I like cage free.. makes me feel better!)
2 egg whites
1/8 cup of Nonfat Cottage Cheese
1/4 cup of berries of your choice (My go to is always blackberries and raspberries)
1 slices of Ezekiel Bread (I like to use any sprouted bread. My goal is to make my own maybe in the next few months!)
1 tablespoon of almond butter (I made my own in my handy dandy Vitamix! Just 1 cup of almonds and ½ cup of water- blend until smooth!)
Coconut oil spray
Fresh chopped basil leaves
Directions:
1. Heat pan on low with a little coconut cooking oil.
2. While pan is heating, in a medium glass bowl crack one egg and add 2 egg whites. Then add the1/8 cup of cottage cheese. Whisk together until everything is combined. Chop a few basil leaves and stir in!
3. Pour into the heated pan.
4. While this is cooking, toast bread in a toaster
5. Cook the eggs until it is no longer a liquid. I like to fold my eggs so they look like an omelet.
6. Smear almond butter on the toast and add the berries on top.
7. Enjoy with a coffee of course!
Total calories for one serving: 323

Raspberry Mint Cream Cupcakes

This past
weekend, Paul and I had a meeting with our priest to discuss wedding details! I
have to say, not to brag, but we honestly go to the best church around, Holy
Trinity Catholic Church in Georgetown. This Jesuit community makes Paul and I
feel like we are back on Hawk Hill in Philly. We really have felt a connection
to this church and I am so excited and proud to get married there in just two
months… from TODAY! Ah!
Anyways, I
wanted to impress the priest so I decided to do what I do best, cook for him! I
love cooking for people! It makes me so happy! I stumbled upon these cupcakes
on Giada’s website awhile ago and I have been dying to make them! They are
truly the most uncomplicated complicated cupcakes ever.
Unfortunately
with our nuptials looming, I have been on a very strict wedding diet so I had
to live vicariously through Paul and Father to see how the cupcakes were,
however since Paul ate six in one day, I assumed they were rather heavenly.


Raspberry Mint Cream Cupcakes
Makes around 24 cupcakes
Adapted from Giada and eatliverun.com
1 box of Vanilla
Betty Crocker Cake Mix
12 oz of
raspberries (2 small containers)
6 mint leaves
and extra for garnish
2 cups or 1 pint
of heavy whipping cream
1 ½ tablespoons
of powdered stevia
Step 1. Bake cupcakes according to the box (alyssa’s note- I used applesauce instead of
oil- cut the cals where you can ;))
Step 2. Let cupcakes cool and remove cupcake wrappers.
Step 3. In a large glass bowl, begin beating heavy whipping
cream and stevia together. You want to the cream to form a whipped cream
consistency and create peaks.
Step 4. Fold in one container of raspberries. Beat the raspberries and cream for a few
seconds.
Step 5. Finely chop the mint leaves and fold
into the cream. Add the remaining raspberries from the container.
Step 6. Cut the cupcakes in half sideways.
Then take a heaping teaspoon of the cream mixture and place on the bottom half
of the cupcake. Place the other half on top and scoop a small dollop on top of
the cupcake. Add one raspberry and small mint leave for garnish.
Step 7. Enjoy J Make sure to refrigerate whatever
you do not eat immediately! Melted cream is not a good look!

BERRY GREEK YOGURT WAFFLES


I don’t think snow days can ever get old in my household! The excitement of watching the television to see if your school district is cancelled is truly priceless! I feel like a little kid every time there is even a chance of snow! My eyes are glued to the TV!
I
finally had more time tonight so I couldn’t wait to try this recipe,
which I have been drooling over for weeks! And after breaking in my new
kicks on the treadmill today, this recipe was a must. Trust me… it..
did.. not.. disappoint! Paul, my favorite taste tester, had seconds and
by seconds I mean he ate my lunch for tomorrow. Thank goodness for
another snow day on Tuesday ;)

Itsy Bitsy Corn Gritzzas
Serves 4- approximately 14 pizzas
Adopted from ahouseinthehills.com
1 cup of Gluten
Free Polenta
3.5 cups broth
(I used vegetable)
2 large yellow
onions
2 bags of
spinach
handful of fresh
basil
½ teaspoon of
dried thyme
sea salt to
taste
4 table spoons
coconut oil
2 cloves of
garlic
4 tablespoons of
chopped pine nuts
1 can diced
tomatoes with green chiles
Directions:
Crust:
1.
First combine 1 cup of polenta with the 3 ½ cups of broth. Then add chopped fresh basil
and thyme. Cook over medium heat for about 10 minutes or until fluffy. Make
sure to stir consistently so the polenta doesn’t stick to the bottom and burn
(yuck)
2.
When polenta is
cooked. Take off the burner. Stir and mix until even thicker. I let it sit for
a few minutes before forming my pizzas! I wanted it to be cool so that I could
touch them and form circles.
3.
Spoon a
tablespoon of polenta onto two greased baking sheet. I used my hand to flatten
the polenta into about 2.5 inch rounds.
4.
Bake for 15-20
minutes until slightly golden brown.
5.
While the
polenta is baking, start the topping for the pizzas!
Topping Time:
6.
Chop two yellow
onions; I left them larger slices than usual. Scoop 3 tablespoons of coconut
oil into a pan (numero uno). Heat pan and then add the onions. Stir every few minutes until
caramelized ( took about 20 minutes) (This was Paul’s favorite part of the
meal)
7.
Sauté 2 chopped
gloves of garlic in a different pan (numero dos). Once golden, add one bag of spinach. Once the
spinach has wilted add the second bag.
8.
Open the can of
diced tomatoes and empty into a small sauce pan (numero tres) just heat over the stove. I thought this adds a little more
flavor.
Don't let the three pans scare you, each ingredient is so delicious is needs it's own pan!
9.
Once the polenta
pizzas are done, add the toppings; I did a spoonful of tomatoes, spoonful of
spinach, small scoop of onions. Then I topped the pizzas with pine nuts.
Finishing
Touches:
10.
Finish off in
the oven until pine nuts are toasted! (10 minutes)
Enjoy!

TOFU KALE QUINOA BOWL

I have been on a health kick lately trying to eat gluten-free and vegan. I
just felt like we were eating too much meat and thought we’d cut back for a bit
(sorry Paul). I have been going on Pinterest like crazy looking at new recipes! I am
so excited to start cooking up some concoctions this weekend!
Tonight
I got home from the gym and I was just super exhausted! I wanted
something quick, healthy and delicious! The best part is everything was
already in my fridge! So this is what I came up with. Hope you
enjoy this as much as we did!
Tofu Kale Quinoa Bowl
Serves 4
2 cups cooked
Quinoa
2 large bushels
of Kale
1 avocado
1 small
container of grape tomatoes (15 or so)- halved
Package of Tofu- diced into small cubes
1 Lemon
Coconut Oil- 1
tablespoon
Salt (to taste)
Pepper (to
taste)
Directions:
1.
Place 2 cups of quinoa in a pot. Add 4 cups of water (sometimes I need
to add a little more). Bring quinoa to a boil then lower the
temperature, cover, and let simmer. Fluff quinoa when all the water is
gone.
2.
While the quinoa is cooking, chop the kale into bite size pieces.
Take about two teaspoons of coconut oil and sauté kale in a pan.
3. While kale and quinoa are cooking, cut the grape tomatoes in half.
4. When the kale is sautéed (almost wilted and slightly crispy) add the grape tomatoes. After dice up the tofu and add as well.
5. Scoop quinoa into the kale mixture.
6. Dice up avocado and add.
7.
Squeeze the juice of one lemon over quinoa mixture. Also add the
remainder of the coconut oil. The lemon, avocado, and coconut oil makes a
light dressing.
8. Add salt and pepper to taste.
9. Enjoy!
BANANA OVERNIGHT OATSLately we have had no time for cooking in the mornings! So, thankfully, I came across a few different recipes for Overnight Oats on Pinterest and I am 100% hooked! You can add any fruit (banana, blueberries, strawberries, apples, pears, etc!!), milk (almond, coconut or even greek yogurt), sweetener (honey, agave or none), oats (steel cut or rolled), the possibilities are seriously endless! The best part- in 5 minutes flat you can have a delicious balance breakfast!


I like to mix it in a big bowl to make sure all the oats get wet from the milk. I have done it in the jar and sometimes the bottom layer is dry!! yuck!

Pour into a mason jar or a container of your choice and breakfast is ready! Sometimes on really cold mornings I like to heat it up! Other times I take it on the go! So easy!
Enjoy!

JUICE JUICE JUICE AWAY!

I finally decided to try a juice cleanse! I have wanted to try one since the day we bought our amazing juicer! After much research and time spent finding recipes (on Pinterest and seeing what would work with my schedule I found something that fit!
So let’s start. I went to Trader Joe’s on Sunday and picked up all my essentials for the juices that I wanted. I decided to drink 6 juices throughout the day (about 2.5-3 hours apart from one another.) I juiced everything but my Nutty Bliss the night before. I know some research says the juice loses it’s nutrients after a couple hours however, there was just no other way and I tried to create as little air as possible between the lid and juice.
First Juice- 7am
Mean Green
5 celery stalks
¼ of a large cucumber
2 green apples (organic if you can)
a handful of kale leaves- make sure stems!!
Handful of parsley
Handful of spinach
1 lemon
Second Juice- 10 am- My FAVORITE
Minty Pineapple Heaven
½ of a small pineapple
2 green apples
mint leaves- I juiced a handful and then just let a few soak in the juice until I drank it
Third Juice- 12:30 pm
Mean Green
Fourth Juice- 3:00- Seriously GOOD
Spicy Lemonade- mix
10 oz. water
3 juiced lemons
2 pinches of cayenne pepper
2 tbsp. blue agave nectar
Fifth Juice- 5 pm
Beet it
1 green apple
3 beets
3 large carrots
Ginger
1 lemon
Sixth Juice- 7 pm
Cashew Bliss- (used a blender)
¼ cup of cashews soaked for an hour
10 oz. water
1 tbsp. agave nectar
2 tsp. cinnamon
2 tsp. vanilla extract
The Run Down
- The morning started out great! I was ready, had energy and was focused! A little before 10 I was craving the drink and thank goodness it was the minty pineapple heaven because that drink is seriously DELICIOUS! It felt like a treat!
- Lunch was great- the mean green was surprisingly filling!
- I could drink Spicy Lemonade everyday that was amazing, which is funny because I was the most hesitant about this drink! It just sounds icky!
- I was really hungry for the beet it and it didn’t disappoint. I like the tastes of beets so it was pretty good and the carrot and apple sweetened it up!
- So I was being silly tonight because I went to spin tonight for 60 minutes. The only reason was because it’s my favorite teacher so I couldn’t pass it up! I would NOT RECOMMEND anyone working out on juice cleanse days! I felt great so I knew I could handle it but you have to listen to your body! I was also hydrating all day!
- Nutty Bliss was a nice treat and I felt nourished after!
- I ended the day with a bedtime Yogi tea which hit the spot!
All in all- successful day! But… I am looking forward to chewing my breakfast tomorrow morning! Hehe

I used 8 oz mason jar glasses from Target. That's why a few of the juices filled up 2. The mean green, beet it, and cashew bliss make around 16 oz.
CREAM-LESS SEAFOOD ALFREDO
I made this recipe a few weeks ago and Paul is still talking about this dish! He absolutely LOVED it! It was super easy and really just needed a few pots, which means very little dishes to wash! A recipe that has easy clean up is a definite plus in our house!
Cream-less Seafood Alfredo
Pasta any type you would like- I used Gluten Free from Trader Joes
1 lb of shrimp
¼ cup Raw Pine Nuts
2 gloves chopped garlic
1 medium Onion- diced
1 bag of Kale
2 tbsp of sun dried tomatoes
2 tbsp of EVOO
1/4 of a cup of Dijon mustard
Juice of 1 lemon
Red pepper
Parsley
Black Pepper
Parmesan Cheese- Optional


First cook pasta on the stove and cook based on the directions. I like it Al dente so I usually cook for about two minutes less than what is recommended. While the pasta is cooking, grab a pan and begin cooking the shrimp. This is super easy! Just dump the bag of shrimp into a pan, cover, and let cook. You'll know the shrimp is done when it starts to turn pink on both sides! While the pasta and shrimp are both cooking, begin the veggies and sauce. Start by browning the pine nuts. This gives such a great flavor to the pine nuts!

In a larger pan, sauté the garlic and a little olive oil. Once the garlic browns, add the bag of kale, chopped onion, pine nuts, and two tablespoons of sun dried tomatoes with oil. Cover and let the kale cook down. While this is cooking, begin the sauce.

Whisked mustard, EVOO, parley, juice of a lemon, red pepper, and pepper together in a bowl. This creates a delicious creamy tangy sauce that is really amazing! You will have to taste test to see if you need to add anymore mustard, seasonings or oil. Just make sure the ratio is even.

When the pasta, shrimp, and veggies are all done cooking, mix all the ingredients together in a large pot. I used the pot I cooked the pasta in! Then pour the mustard sauce over the pasta. Make sure to mix all the ingredients together here so nothing is dry.

Yummy! Sprinkle a little parmesan cheese if you would like!

Enjoy!
CLEAN ALMOND BUTTER AND CARAMEL BITES
A few weekends ago I was going to Christmas dinner with my future-in-laws! I wanted to make something special but also something that wouldn’t hurt my clean eating ways! So I stumbled upon this recipe on Pinterest. Then I found ways to make it clean! It was quite tasty! Even skeptical Paul loved them! He couldn’t resist!
Clean Almond Butter and Caramel Bites
EVOO
1 cup of Almond Butter
¾ cup of Honey
2 tbsp of Arrow Root
½ a cup Whole Wheat Flour
1 teaspoon of pure Vanilla Extract
1 Egg
½ cup of Slivered Almonds
Almond Milk (if needed to make caramel not as thick- I didn’t have to use it this time!)
¼ cup of Organic Maple Syrup
Corse Sea Salt

The Ingredients

Now mix the egg, whole wheat flour, honey, vanilla, slivered almonds and almond butter in one bowl. It should look like picture below when you are done.

The peanut butter dough

Grease your tiny muffin tin. Make sure to grease well or your delicious almond bites will not come out! While these are cooking start on the caramel. Bake at 350 degrees for about 12-14 minutes.

In a small saucepan, whisk maple syrup, vanilla and arrowroot. Heat on medium and cook, whisking constantly, until thick, about 5 minutes.


While your peanut butter cookies are still hot take a spoon and make small dents in the middle of the peanut butter cookies. I actually used a bottle stopper oddly enough!!

This is what it should look like!


Now carefully take a teaspoon and fill the holes with caramel. Be careful here not to put too much or it will overflow out of the cups!


Finish by sprinkling with coarse sea salt!
Enjoy guilt free!
xoxo Lyss
CLEAN TOMATO SOUP AND GRILLED CHEESE
The other weekend I was able to reap one of the best benefits of being a teacher; a snow day! So with all this extra time on my hand, I was able to make a few dishes that I have wanted to make this winter season. So I bring you a Clean Eating Tomato Soup and Grilled Cheese. As my favorite taste tester, Paul said, he would eat this every night!
Clean Tomato Soup and Grilled Cheese
(makes 4 servings)
Tomato Soup
Garlic- 2 cloves minced
Ginger
4- 5 medium Celery Stalks- diced
3 Carrot Sticks or 20 or so Baby Carrots- diced
1 Can of Peeled Tomatos
1 Can of Tomato Paste
1 Red Onion- diced
Salt
Pepper
EVOO
Chicken Broth- incase too thick- optional
Parsley
Basil
Sundried Tomatoes in oil
Olive Oil Spray
Pepper
Red Pepper
Cilantro- chopped for garnish
Grilled Cheese:
Ezekiel Bread
Mozzerella
1 Avocado

The Ingredients
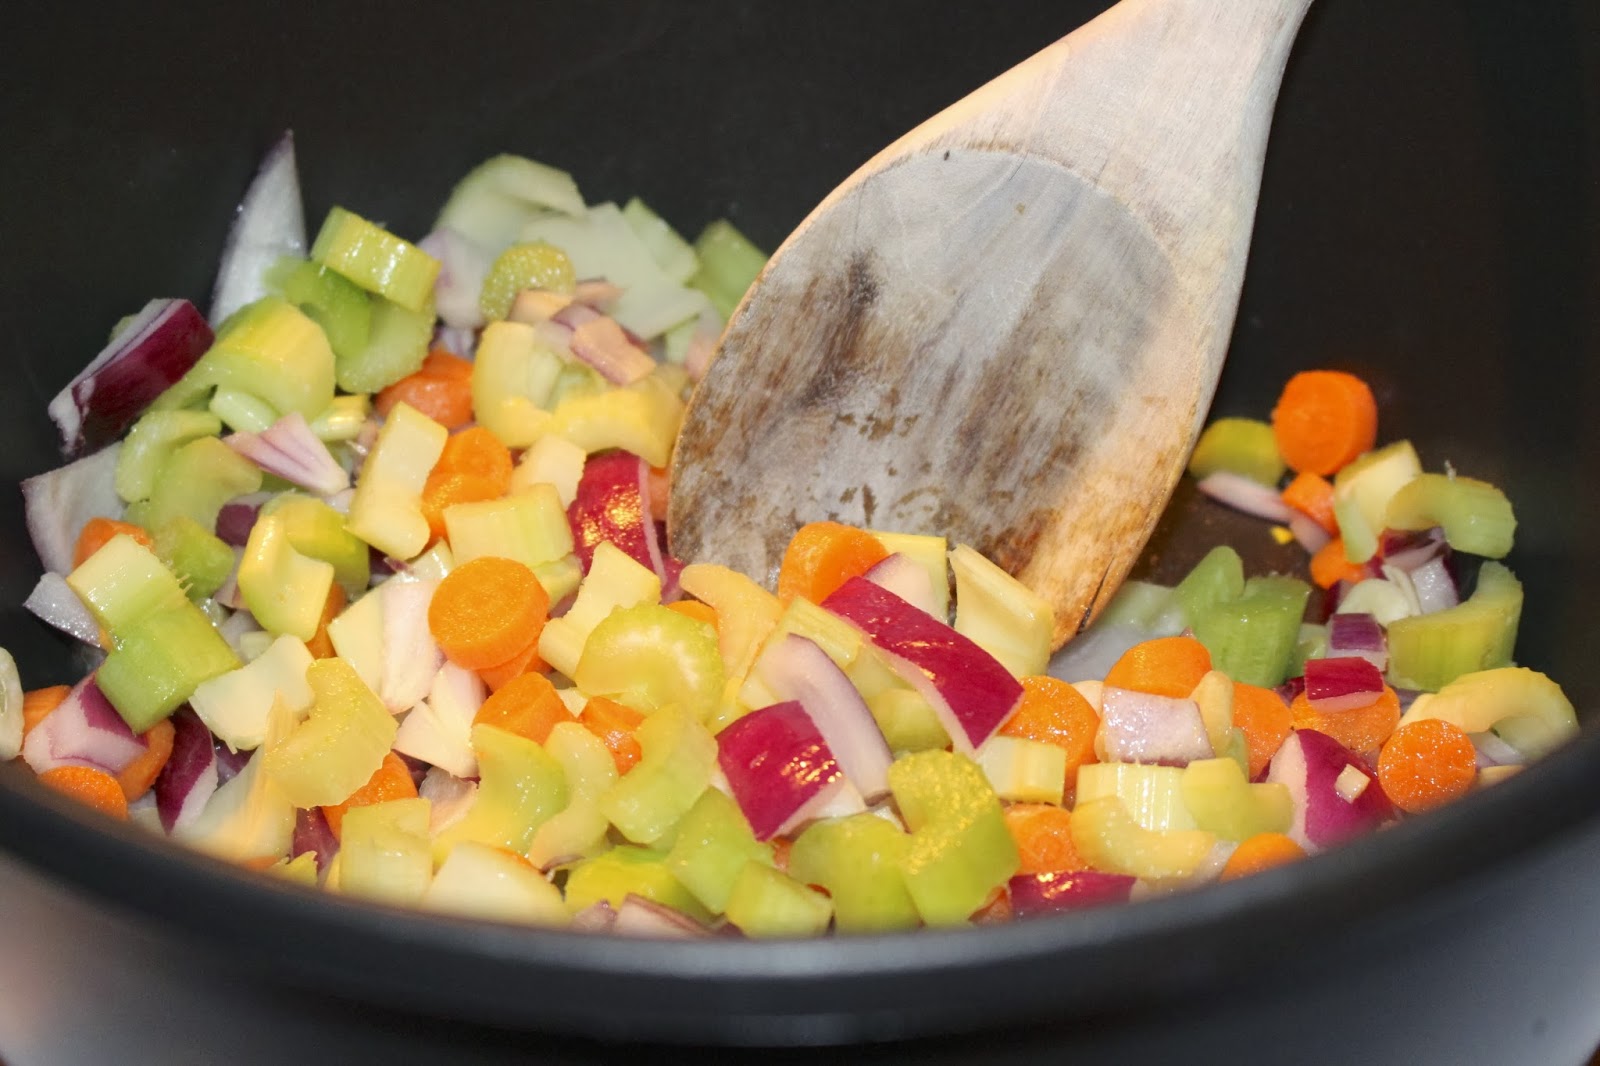
I start first by sautéing some olive oil in a large pot. Then I dice the celery, carrots, red onion, ginger, and garlic.

After those vegetables sauté for a few minutes I add the parsley and basil.

Once the vegetables start to brown, I add the peeled tomatoes.

Then comes the tomato paste. Now I let this soup cook down for about 20-30 minutes. The longer the better the flavors!

While the soup is cooking down, I begin my sandwich. You could always make the "open faced adult grilled cheese" or this grilled cheese above. I sprayed the pan with olive oil then place the bread, 1-2 slices of mozzarella cheese and 1/4 of an avocado.

When the soup is done being cooked on the stove (when it is thick and all the vegetables are cooked through) it is time to take the pot off the stove. Then place the soup in the blender. Slowly spooning the soup into the blender. Start on low and move to medium and then high. The soup can be as chunky or smooth as you would like. This is the time that I would add chicken broth to cut down the thickness if you would like. I thought the chunkiness was perfect.


Enjoy,
Lyss
I am always drooling over pasta recipes that are all over Pinterest but I also know I have a wedding dress to fit in, in 7 months. So with that being said, I was on the mission for a good spaghetti squash recipe that would involve my favorite herb, basil! I luckily just stumbled on this recipe on the blog, bigeatslittlekitchen. I don’t necessarily follow the Paleo diet but I think this recipe is fabulous!
Paleo Pesto Spaghetti Squash
(makes 5 servings)
2 packs of Chicken Sausage ( I used Basil Pesto and sundried tomato
from Trader Joes)
2 small spaghetti squash
20 or so Grape Tomatoes, left whole
½ cup cashews, soaked in water for 30 minutes or more
Onion
Mushrooms
Package of basil
Parmesan Cheese (optional and makes it not pale)
Salt
Paprika
Red Pepper
Fennel
Black Pepper

The ingredients

Before placing the spaghetti squash in the microwave, you must poke holes all over the squash. I usually place the spaghetti squash in the oven for about 10 minutes. I know it is ready if it is soft to the touch. Then BE EXTREMELY careful because this is one HOT Squash! I usually let it sit for 10 minutes or so before I cut into it.

While the squash is in the microwave I begin cooking the chicken sausage. About one link is a serving size.

Then I start with my vegetables. I like to really sauté these veggies together! I usually dice up the garlic and spray the pan first. After I add the onions, sauté a little, then add the mushrooms and tomatoes!

Now that everything is cooking, it is time to make this deliciously creamy pesto sauce. I had previously soaked the cashews for about 30 minutes. Then I add the cashews to the blender. I pour it with the water it has been soaking with. My blender is not the best! Then I add red pepper, LOTS of basil, pepper, salt, paprika, and if you'd like 1 tbsp of oil. If you want to skip the oil, you can add a tbsp of water instead! I happened to have Basil Olive Oil from this cute little oil shop in Old Town Alexandria called Olio! It is adorable! I think this oil is delicious!

Blend everything together and taste the sauce. You may need to adjust spices accordingly! I had to add my dash of salt here.

Now back to the chicken sausage. I love that charred taste on my sausage so what I like to do is I cook the sausage until it is almost done. Take it off the stove and then cut it into pieces. This helps to ensure that delicious grill taste! I did sprinkle a dash of fennel here.

Then when I have cooked both the squashes in the microwave, I let it sit for about 10 minutes. I cut the squash lengthwise. I scoop out all the seeds and then scrape the "spaghetti" out of the squash.

Place all the ingredients in one big pot that is big enough to mix everything together.

After I add the sauce and mix everything together. Doesn't that look yummy!!

I'm Italian so I think everything that is even close to being pasta related needs to be garnished with parmesan cheese. However, this does make this dish not Paleo. So, if you're trying to stick to the Paleo lifestyle, then I wouldn't add the cheese!

This dish is one of my new favorites! Paul even gave it the thumbs up too!
Enjoy,
VEGETARIAN BURRITO BOWL
This dish is SO easy, SO quick, and SO delicious! It is my “go to” dish when I’m in a rush and do not have a lot of time! I also think this is such a great flexible dish you could add chicken, shrimp or steak if you want to make it not vegetarian! Let me know what you think!
Vegetarian Burrito Bowl
(makes 4 servings)
Olive Oil Spray
Garlic- 2 cloves minced
1 pepper- diced
15 or so Grape Tomatoes, left whole
1 sweet onion
2 carrots
Package of Rosemary
Garlic
Salt
Pepper
Green Onions- 2 stalks diced
1 can of beans
Rice- I used Trader Joe’s Harvest Blend
Cheddar Cheese- shredded
Cilantro- chopped for garnish


Follow the directions on whatever rice you use to cook while you prepare the rest of the dish!


Dice all the vegetables and sauté together with a little olive oil spray. Cook until tender. Once the tomatoes start cooking down, start pressing them with a wooden spoon so they crush down.

Once all the veggies are sautéed together and tender, add the black beans.

When the beans are cooked and a little soft, the start to split a little, then mix in the rice.

Sprinkle with Cheddar Cheese and Cilantro! Enjoy
xoxo, Lyss
OPEN FACED "ADULT" GRILLED CHEESE
When I am searching for new dinner options, I like to find simple recipes that I can modify to fit my “healthy” lifestyle. While I am not perfect, obviously, I try my best to eat clean and healthy when I can! I try not to get caught up in the new diet fads, for example, no carbs, no dairy etc.! So with that being said, this is a delicious EASY dinner recipe that can be modified to fit anyone! So without wasting anymore time....
Open Faced “Adult” Grilled Cheese
adopted from the pearls, handcuffs and happy hour
(makes 4 servings)
1 package of Deli Turkey (8 oz)
4 slices of Eziekiel Whole Wheat Bread
1 package of Turkey Bacon
1 Ripe Avacado, cut into fourths
Coconut Oil Spray
1 tomato (optional not shown)
Cheese (any kind- I used low fat cheddar slices here)


uhhhh yummmm. When I see this picture I think of that commercial for dog food, "bacon bacon bacon bacon I love bacon!"


Add the Turkey Bacon


I like to make sure the bottom is nice and toasted! However this is a personal preference!

Anddd.... Voila!
Enjoy,
Lyss"SKINNY" PUMPKIN FRENCH TOAST
I don’t know what it is about Sundays, but I always wake up ABSOLUTELY craving brunch! Eggs Benedict, French Toast, Omelets.. yum! As much as I’d love to run out the door to one of our favorite brunch places in Claredon with Paul, I have to reel myself back in and remind myself we have a honeymoon to pay for! So, instead I summoned my inner chef and here is the delicious concoction I made this past weekend! And if I do say so myself, it was quite delicious and healthy! As Paul said, “Can we have this again tomorrow morning?”
PUMPKIN FRENCH TOAST
(makes 3 servings- 2 slices each)
Cooking Oil
1/3 cup of Egg Whites
1/3 cup of Almond Milk (or any other type of milk)
1/3 cup of Canned Pumpkin
2 Eggs
6 slices of Ezekiel Cinnamon Raisin Bread
Cinnamon
Nutmeg

Let’s start with the eggs. Grab a bowl that is big enough that you can whisk your ingredients together and soak the bread.

Time for the egg whites, pumpkin and almond milk.

Whisk everything together!!
Now I really really, I mean really, love cinnamon anything. So I don't even bother to measure cinnamon because I never have enough! I would say about 2 tsp of each cinnamon and nutmeg but it's up to you!

Time to whisk everything together again! The result should look like mine below!

Time for the fun stuff!!

Now while the bread is soaking in our egg/milk/pumpkin mixture, I take out my pan, spray it, and let it get nice and hot! As Paul says, I need to really let all that “goodness” soak into the bread!

I like to use Trader Joe's Coconut Oil Spray..just personal preference!


How Yummy does that look?!?!

I like to drizzle honey all over the french toast because I don't really like syrup. I think this tastes delicious with walnuts or I bet pecans would be great too! Of course don't forget to top it off with some extra cinnamon!
Enjoy!
SKINNY PEANUT BUTTER AND BANANA SMOOTHIE
Most mornings are rather hectic around here! We're both getting ready, packing our lunches and trying to pick up along the way. Sometimes it's just too much to make a full breakfast so this is my "go to" smoothie when I am rushing! It is so delicious and filling with the protein and peanut butter. I always feel energized after drinking this delicious meal! Let me know what you think!!
Skinny Peanut Butter and Banana Smoothie
(makes 2 servings)
1 tbsp Peanut Butter ( unsalted creamy)
1 Banana
1/2 cup of Almond Milk (or any other type of milk)
1 scoop of Protein ( I use Raw Fit)
¼ of cup Blueberries
4 ice cubes
Cinnamon {optional}
Here are the ingredients:


Add one banana

I usually don't measure out the blueberries but I would add about 1/4 of a cup

1 tbsp of peanut butter

1 scoop of Protein Powder


This is when I add 4 ice cubes. Also you could always add the cinnamon here!
Look at all that goodness in one blender!
Yum!!


Enjoy!
xo Lyss
Turkey CheeseBurger Salad
I
can’t tell you how many times I have come home and said that I don't
feel like cooking! I want something easy and quick! Then I stumbled upon
this recipe and ......Tadaa!! It is our absolute “go to”
when we don’t have a lot of time but want something delicious and
healthy! This is also the
PERFECT couple meal because it has the meat and all the fixings, which
Paul
loves, and it’s a salad so it’s perfect for me!
Turkey
Cheeseburger Salad
adopted from the Pioneer Woman
(makes 4 servings)
1lb of turkey meat
2 tbsp of Barbecue Sauce {Paul likes this brand!}
2 tbsp of Barbecue Sauce {Paul likes this brand!}
2 tbsp of brown mustard
2 tbsp of organic ketchup
4 pieces of Whole Wheat Eziekiel Bread- sliced into
4 pieces of Whole Wheat Eziekiel Bread- sliced into
squares {these are for the croutons}
1
bag of lettuce
1
tomato
Carrots
Cheese (any
kind- I used low fat cheddar slices here)
Jar of Pickles

The amazing ingredients {Tomato, Light Cheddar, Eziekiel Whole Grain Bread, Trader Joe's Barbecue Sauce, Pickles, Lettuce (romaine), Organic Ketchup, Brown Mustard, Ground Turkey Breast, and Carrots}

I
like to start toasting the bread before the meat to ensure toastastic
croutons! I first spray the pan with Coconut Oil and then spray the
bread evenly on both sides. After I slice the bread into squares to make
it look crouton-esque.


Now it's time for the barbecue sauce.

Then I mix all the ingredients together and this is what it should look like!
Occasionally I'll have to add a tiny bit more of each
ingredient{mustard, ketchup and bbq} if all the turkey is not coated in
this delicious mixture.

I place the salad on a plate and add tomatoes, carrots, and pickles! As much or as little as you want of each!

Yummy my favorite part! The homemade croutons are ready! I like them almost a little burnt!

I usually dish
about 1/4-1/2 cup of turkey mixture on each salad, depends on who it is
for and how hungry we all are! After I sprinkle some cheese on top
which, melts over the hot turkey! No salad dressing is needed!
Enjoy,
xo, Lyss
No comments:
Post a Comment
I love reading each and every message! I will always reply to them!